STAY-AT-HOME BILLI BI

A trip to the grocery has turned into a nerve-wracking adventure during this pandemic.  My gloved hands grow sweaty as I wander one-way aisles looking for the reassuring necessities of my solitary life.  Which staple will be missing because of the caronavirus?   Panic buying of toilet paper was followed by a run on yeast and flour for baking. An imminent shortage of steaks and chops has carnivores on edge.

I finally stop and breathe a sigh of relief at the fish counter.  Small jet black mussels resting half-hidden in shaved ice await shoppers who value their sweet succulent flavor that conjures up the scent of coastal waters where they thrive.  These tasty bi-valves are sustainably farmed in inlets of Prince Edward Island and shipped throughout the States.  One serving delivers a hefty amount of protein (18 gr.), iron and B12 for a modest price.  Talk about fresh, unlike everything else in the grocery, mussels are alive!


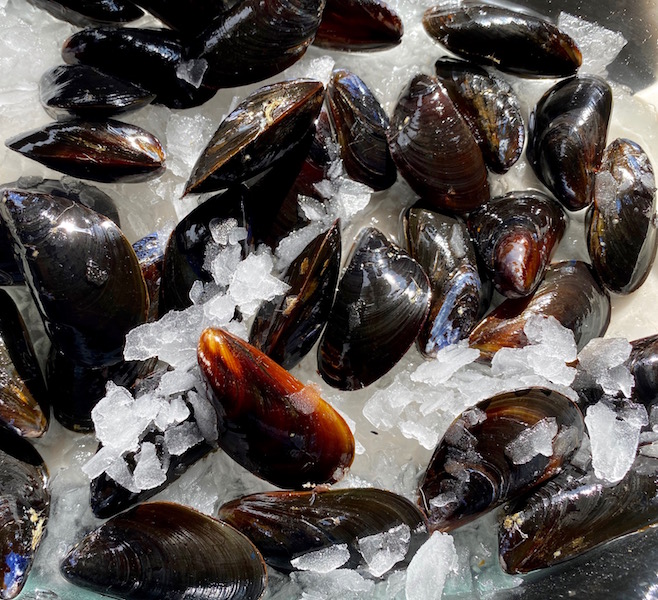
 A well-trained salesperson bags mussels sorting out those with shells that are broken, empty or won’t close when gently pressed.   Each purchase receives a hand shovel of ice and a few pokes with a knife to allow air into the plastic bag.  Mussels will survive for a few days in your refrigerator but are best when cooked on the day of purchase.  Rinse them under cold tap water, cull any whose shells remain ajar after a tap on the kitchen counter, and trim off an occasional ropey bit with scissors.  (Mussels grow a ‘beard’ to anchor themselves to a boat, rock or rope.)

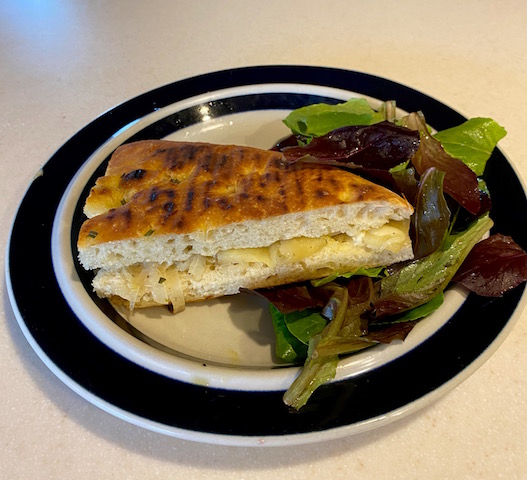
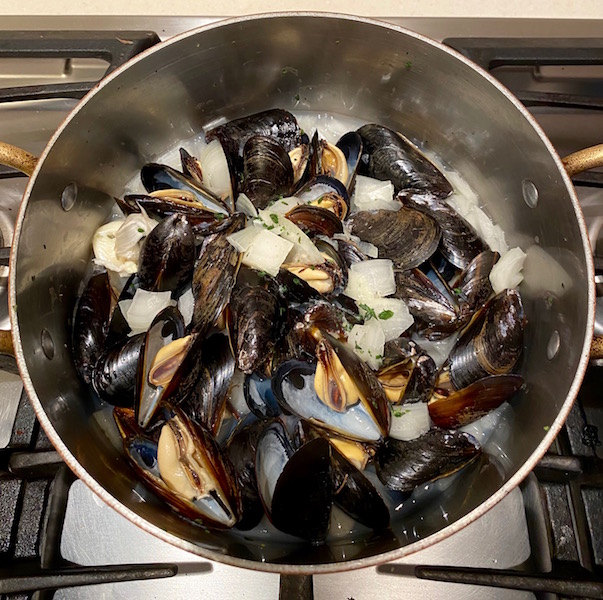
It takes about 5 minutes for mussels to steam open in a shallow bath with water, wine, chopped onions and thyme.  You can stop there, turn the contents of the pot onto a serving platter and sit down to eat with a crusty baguette and a glass of icy Muscadet.  Steamed mussels (Moules à la Marinière)  is considered a simple, satisfying feast in France.  They are easily separated from their shell with a fork and the cooking juices at the bottom sopped up with bread.

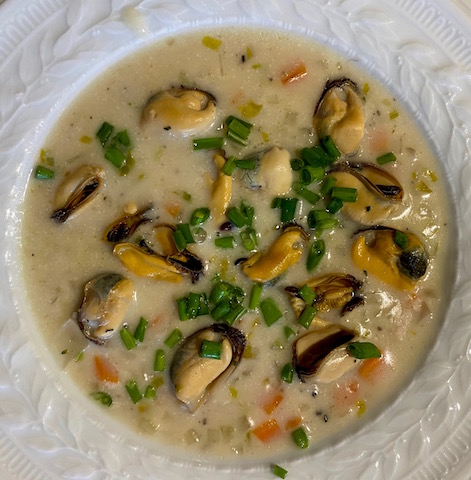
A motivated cook can take turn steamed mussels into soup in another 10 minutes with amazing results.  Remove the mussels from their shells, reunite them the strained cooking liquid and some heavy cream.  Voila!  The resulting soup is worthy of a Michelin star.  OK, I left out some details, but not many.

I imagine this wonderful soup has roots going back to a simple kitchen in Brittany.  It acquired its odd name and a backstory in the 1890's when chefs would flatter celebrities by naming their signature dishes after them.  In this case, Billi Bi was the nickname of the wealthy American financier, William B. Leeds, who dined often at Maxim’s in Paris and was a great fan of their signature cream of mussel soup.  


BILLI BI

Yield for 2 servings (double/triple as needed)

1 pounds mussels
1/3 cup dry white wine
1/3 cup cool water, more later as needed
1/2 medium onion, peeled and chopped
1 clove garlic, crushed with skin left on
1/2 teaspoon fresh thyme leaves, chopped (1/2 teaspoon dried thyme)
1/8 teaspoon freshly ground black pepper
1 tablespoons unsalted butter
1/3 cup each diced shallots, carrots and celery
1 teaspoon arrowroot or potato starch dissolved in 2 tablespoons water
Sea salt and freshly ground black pepper to taste
1/3 cup heavy cream
1 tablespoons minced chives

Rinse the mussels in cold water; discard any with broken shells or that gape open  when pressed close.  Trim off "beard" attachments.  Place them all in a large non-reactive saucepan along with the wine, water, onion, thyme and pepper.  Bring liquid to a boil, cover and cook tossing and shaking the mussels to splash juices over the shells.  After 5-6 minutes, after all the shells have opened, drain the pot into a colander over a saucepan.  When the mussels are cool enough to handle, remove them from the shells.  Reserve the mussels and discard the shells. 

Melt butter in a 4 quart saucepan.  Cook the shallot, carrot and celery pieces over medium low heat until they soften.  Strain mussel cooking liquid and add water to measure 1 cup.  Return the broth to the vegetables, add the cream and bring to a simmer.  Add the starch mixture and season with salt and pepper to taste.   Ladle the soup into bowls, distribute the mussels among the servings, garnish with chives and serve.

STAY-AT-HOME BLUEBERRY UPSIDE-DOWN CAKE


If there is a food that serves as a metaphor for our current lifestyle, it has to be a blueberry upside-down cake.  Seriously, hear me out.  Here is a vintage dessert that turns the idea of a cake literally on its head.  A cake where the unexpected substitution of blueberries for pineapple can become the new normal.   It proves that, “Hey, you can do this!”

Another upside-down aspect to this cake recipe is its provenance. I came across it a decade ago when I served as a judge for the James Beard Foundation’s annual cookbook awards.  Among the three dozen books they sent me to evaluate was Michelin chef Thomas Keller’s  ad hoc at home,  a volume of “family-style” recipes.  One of my duties was to test recipes from my three favorite books.  I chose Keller’s recipe for Pineapple Upside-down Cake, because it looked easy enough for a home cook with basic baking experience.  In his introductory notes to the recipe, Chef Keller suggests the possibility of substituting other fruits.  I can’t even take credit for that.

Why did I choose blueberries over other berries or fruits such a apples, pears or mangoes?  I admit my choice was a simple matter of timing.  An eighteen ounce container of Driscoll blueberries was on special the day I shopped at Whole Foods.  

In the last decade I’ve succumbed to purchasing Driscoll berries in the winter when locally grown berries are not available.  The Driscoll company is the oldest and largest purveyor of a seasonless supply of berries grown and shipped from all over the hemisphere. I can’t vouch for the sustainability of their agricultural or environmental practices.  That’s a subject for a future post once we get past our current trauma.


BLUEBERRY UPSIDE-DOWN CAKE 

Pan Schmear (enough for 2 recipes)

1 stick (4 oz) unsalted butter, at room temperature

1 1/2 tablespoons honey

1/2 teaspoon dark rum

1 cup, packed, light brown sugar

1/4 teaspoon vanilla paste or extract

Kosher salt

18 oz. fresh blueberries 

Cake

1 1/3 cup cake flour

2 teaspoons baking powder

1 stick (4 oz) unsalted butter, at room temperature

1/2 cup plus 2 tablespoons granulated sugar

1/2 teaspoon vanilla paste or extract

2 large eggs

1 tablespoon plus 1 teaspoon milk

Preheat the oven to 350 degrees.  Generously butter a 9” cake pan.  Line the bottom with parchment paper.  Butter the paper.  Set aside.

Combine the butter, honey, rum, sugar and vanilla in the workbowl of a mixer fitted with a paddle, and blend until smooth.  Spread 1/2 of the mixture over the parchment liner in the bottom of the pan.  Seal the remaining schmear in a jar or bag and refrigerate for a month or freeze for longer a longer period.  Lightly salt the schmear.

Rinse and pick over the blueberries.  Dry them by gently rolling in a towel.  Spread them evenly over the schmear.

Sift the flour and baking powder into a bowl.  Combine the butter and sugar in the workbowl of a mixer fitted with a paddle attachment, and mix over medium speed for 3 minutes, stopping twice to scrape down the sides of the bowl.  Mix in the vanilla, the eggs, one at a time and the milk stopping to scrape down the sides of the pan after each addition.  Add the flour mixture in 3 installments, scraping after each addition, and stir until just combined. 

Spread the batter over the berries, smoothing the top to completely cover them.  Bake for 45 -50 minutes, turning the pan after 15 minutes if you do not have convection baking.  The cake is done when a toothpick inserted in the center comes out dry.  A digital thermometer will read 200 degrees when inserted in the center..

Remove the pan to a rack to cool for 20 -30 minutes.  Run a knife around the edge of the pan, place a serving plate on top of the pan and invert the cake onto the plate.  Remove the parchment if it sticks to the fruit.

Serve warm or at room temperature with crème fraîche 

Recipe adapted from ad hoc at home by Thomas Keller.

STAY-AT-HOME BROWN SODA BREAD


More supermarket shelves were bare here in America’s heartland over the weekend.  It came as a shock to see rows of empty self-serve steam tables and display cases vacant of fresh fish and meats.  What’s going on?  

 We can only surmise that food supply and delivery systems are disrupted as workplaces close to protect employees from the spread of the coronavirus. What if I can’t find my favorite brand of steel cut oatmeal next time I shop?  In the face of this level of uncertainty, I have only one recourse.  I bake bread.

You may be surprised to learn that a simply delicious loaf of Brown Soda Bread takes less time and effort than baking a batch of chocolate chip cookies.  (You will thank me for this advice if you take it.)  Soda bread has street creds too.  Before the Irish attached their name to it, a soda bread recipe had appeared in America’s first cookbook, The Virginia Housewife in 1824.  Today the Society for the Preservation of Irish Soda Bread (they’re for real) insists that the true recipe consists of flour, salt, baking soda and buttermilk.


 Soda bread dates from a time when bread was baked in a covered pot over an open fire or  nested among hot embers.  I spent a morning some time ago watching a black cook prepare an entire meal over a spacious hearth in the George Whyte House at Colonial Williamsburg.  Cooking as if conducting an orchestra, she worked intuitively, shifting the height and distance of various pots from the fire while simultaneously monitoring its heat.

That kind of intimate interaction led to the discovery and formulation of chemical leaveners in the 19th century,   At some point an attentive observer realized that the hissing sound from liquid spilling onto hot ashes was a chemical reaction worth containing.  The baking powder we purchase today contains bicarbonate of soda (from ashes) and two mild acid compounds that combine in the heat of the oven to create carbon dioxide bubbles that cause the bread to rise.  Voila!

BROWN SODA BREAD

1 cup unbleached white flour

1 1/4 cup whole wheat flour

1 teaspoon brown sugar

1 teaspoon baking soda

1/2 teaspoon baking powder

1/2 teaspoon salt

3/4 cup buttermilk (or 1 tablespoon lemon juice or vinegar stirred into milk)

1 large egg

2 tablespoons butter, melted

Preheat the oven to 375 degrees.  Place your largest, heaviest Dutch oven (cast iron is the best) in the oven with its cover on.

Stir together the flours, sugar, baking soda, baking powder and salt in a mixing bowl.  If using milk acidulated with lemon juice or vinegar rather than buttermilk, let the mixture stand for 10 minutes before blending in the egg.

Make a well in the center of the dry ingredients, pour in the buttermilk and egg liquid as well as the melted butter. Mix the liquids briefly then fold the dry ingredients into the wet until combined.  Turn the dough out onto a lightly floured work surface.  Dust your hands with flour, and lightly knead the dough for a minute or so adding more flour by the tablespoon until you can work it and keep your hands almost dry.  Shape the dough into a cushion, transfer it to a sheet of parchment and score the top 1/2” deep.

Remove the pot from the oven, uncover and carefully drop in the dough into using the parchment as support.  (Generously spritz the dough with water if you have a mister.)  Cover the pot and return to the oven for 40 minutes.  Remove the Dutch oven, uncover, lift out the bread and parchment liner.  Slide bread off the paper onto a rack and allow it to cool to room temperature. 

Serve in thin slices with butter and homemade jam.

 BONUS: RHUBARB GINGER JAM

 Ingredients for 1 1/2 cups

1 pound fresh rhubarb, trimmed at both ends and cut into 1” long pieces

1 cup sugar

3 strips lemon peel

2 slices ginger root, unpeeled, the size of quarters

1 tablespoon lemon juice

1/4 cup diced crystallized ginger (optional)

Jam:  Combine and stir together the rhubarb pieces, lemon strips, ginger root slices and 1/3 cup sugar in a 4 quart saucepan.  Cover the pan and allow to stand for 30 minutes.

Bring the fruit and accumulated juices to a simmer and cook, barely simmering for 10 minutes.  Add the remaining sugar in two installments allowing the jam to return to a boil before adding more. Stir regularly to prevent sticking.  Add the lemon juice and continue cooking until almost all of the excess juices have reduced, before the jam starts to stick to the bottom.  Off the heat, pour the jam into a two cup measure.  

Pour the jam to within 1/2” of the rim of each jar.  If the edge has a drop of jam on it, wipe it clean with a paper towel dipped in the hot water bath.  Attach the lid, screw the cap on tightly and invert the jar for 15 seconds (to sterilize the air remaining in the jar) before returning it right side up to the rack.  Store cooled  jars in dark, cool place  The jams taste best if consumed within 6 months.  They make great gifts!  You can also store jam in unsterilized jars in the refrigerator.

Prepare preserving jars in advance:  3 quarter-pint quilted jars, or 1 1/2 pint and 1 quarter-pint jar.  Submerge them in boiling water for 15 minutes.  (A pasta pot with an slotted insert is the best container because jars won’t bounce around on the bottom.)  Let jars cool on a rack, dip the jar lids in the boiling water and then cool on a rack.  Screw caps do not have to be sterilized.

Link to more recipes for baking powder breads 


STAY-AT-HOME COCKTAIL HOUR


Restaurants are desperate to find a way to reopen this summer and maintain social distancing guidelines.    Cafes and bars are unlikely to make a profit with only 25% of their normal seating capacity.  How will they overcome the ghastly cost-benefit ratio created by these restrictions?   As usual, the dining-savvy French have a solution.

Televised footage on France 2 recently showed proposed curbside dining in Paris.  That’s right, a small table and  two chairs were set up on the street side of the curb.  In the spirit of full disclosure, it 'was in a no-parking space.  In this city of charming narrow streets visitors soon learn to share the sidewalk with the outdoor cafe seating.  If it’s allowed, car passengers may soon be able to eye diners with their plate of steak frites at arm's length.

No one seems to care in France; they know how to adapt.  When smoking indoors was banned in
2006,  Paris restaurants quickly expanded and weatherproofed their outdoor terraces to accommodate smokers.  On the other hand, the ability to sit in an outdoor cafe and nurse an espresso or glass of wine for an hour takes years of practice to master. 

It’s unlikely that American cities will embrace France’s cultural norms, but economic hardship is bound to force changes to the outdoor dining scene this summer.  Stay-at-homers need not worry.  The pleasant ritual of a cocktail with a tasty homemade spread on crackers requires little more than a little forethought and the desire to enjoy life at the table.

This post was inspired by recipes sent by Elizabeth Dill and Chris Rowbottom who have traveled with me to Paris and Provence. The Beet Tzatziki is a great stand-alone starter or side-dish. Ruth Reichel’s Liver Pate recipe is an easy riff on an classic starter that pairs well with any cocktail.  

My addition to the cocktail hour is mellow Ramp Butter.  Ramps are wild miniature leeks which the Menonimee Indians called 'shikaakwa' and French explorer LaSalle translated to 'Checagou' when describing the area we now call Chicago.  In the past, ramps appeared in early spring exclusively on menus of high-end restaurants.  This year 4 ounce bundles of ramps have been available at Whole Foods in the Chicagoland area.  

***********  

LIVER PATE

1 pound chicken livers, cleaned

1 small onion, finely chopped

1 1/2 sticks cold unsalted butter

1 small apple, peeled, cored and chopped

3 tablespoons Cognac or Calvados

2 tablespoons cream

1/2 tablespoon kosher salt; 1/4 teaspoon black pepper, ground

Remove the veins from the livers.  Hold filament between the two lobes and scrape out the thin veins on both sides.  Pat dry and set aside.

Saute the onion in 2 tablespoons butter until soft, about 3 minutes.  Add apple and cook another 3 minutes.  Put into a food processor.

Melt 2 tablespoons butter, lightly season the chicken livers and add to the pan, sauteing over high heat for 4 minutes (2 minutes on each side).  They should be brown on the outside and still pink within.  Remove from the heat, take away from the stove and add the Cognac.  Return to the heat and carefully put a lighted match into the pan, swirling until all the flames die down and all the alcohol has burned off.  Add livers to the food processor.

Pour in the cream and puree until smooth.  Add the remaining butter, bit by bit until smooth.  Season to taste, then pour into little bowls or crocks and chill for at least 3 hours.  Bring to room temperature before serving.

Recipe from Ruth Reichl My Kitchen Year  

***********

SOFRA’S BEET TZATZIKI

Ingredients for 2 1/2 cups:

1 cup cooked, shredded beets (any color)

Vegetable oil

1 teaspoon minced garlic (one clove)

2 teaspoons fresh lemon juice

1 teaspoon kosher salt

1 1/2 cups whole-milk plain or sheep’s milk yogurt

1 tablespoon olive oil

1/4 teaspoon freshly ground black pepper

1 tablespoon chopped fresh dill

Salt and pepper to taste 

Preheat the oven to 400 degrees.  Trim the root end of the beets, coat them lightly with vegetable oil and wrap tightly in foil.  Roast them in a skillet with 1/2 cup water until they can be pierced easily, about 1 hour.  When cool enough to handle, remove foil and rub off the skin with a paper towel.  Grate the beets on the largest hole of a box grater. 

Combine the garlic, lemon juice and salt in a mixing bowl.  Allow this mixture to sit for 10 minutes to mellow the garlic.  Stir in yogurt olive oil and 1/4 teaspoon freshly ground black pepper.  Fold in the beets, fresh dill and season to taste.  Serve cold or at room temperature.

Recipe from Spice by Ana Sortun

************

RAMP BUTTER

Ingredients for 1 1/2 cups

1 bunch ramps (4 oz)

8 tablespoons unsalted butter

1 tablespoon lemon juice

Salt and pepper, to taste

Trim off root end of the ramps, rinse them thoroughly under cold running water.  Cut the entire ramp into 1” pieces.  Saute pieces in 1 tablespoon butter for 5 minutes, or until they are completely wilted.  Puree ramps with remaining butter, cut in 1/2” pieces, and lemon juice.  Add salt and pepper to taste.  Refrigerate and allow to come to room temperature before spreading on crackers or sliced baguette.

Recipe adapted from Shelly Westerhausen, Vegetarian Ventures


STAY-AT-HOME GRILLED CHEESE WITH ONIONS AND APPLES

The importance of keeping a daily routine is one of my favorite pieces of unnecessary advice we have received to help us survive this long period of social isolation.  Who among us has not had a daily routine since forever and can’t create a new one in a heartbeat?   The real challenge, is to nudge ourselves forward in everything we do, to evolve rather than simply tread water from day to day. 

 Mealtimes are a good example of opportunities to balance the comforts of familiar with the pleasures of novelty.  Under normal circumstances, daydreaming about what to eat next is considered a distraction.  It becomes a distinct advantage when a family spends the day together.  Dinner doesn’t have to be the’ big meal of the day.  Confinement erases this hierarchy.  In this moment we can rethink lunch as a family affair.


 ROSEMARY ASSEMBLES A GRILLED CHEESE SANDWICH

Grilled cheese is the first hot sandwich that American children learn to eat.  Its popularity lies in the way its warm, crunchy bread and gooey cheese consistency briefly overwhelms the senses.  How else could a sandwich made with flavorless industrial grade bread and cheese become so famous?  There's no question, the grilled cheese sandwich is a prime candidate for a makeover. 

My current version accentuates the tender, unctuous mouthfeel of grilled cheese with the addition of slowly cooked onions and apples.  The crisp, toasty fragrance of home baked focaccia (see my recent blog) adds a satisfying contrast.  There are many possible variations on this theme for you to explore.  Sliced Vidalia onions would make a sweeter choice; they require more attention because they get mushy quickly.  A baguette or sourdough country bread slices could easily replace the focaccia.  With any bread, cut slices no more than 1/2” thick so that the cheese melts before the bread becomes too dark. I chose a dried herb seasoning because it can withstand a long cooking time.  Fresh chives, thyme or parsley added just when the onions finish cooking would be even more aromatic. 

GRILLED CHEESE SANDWICH WITH ONIONS AND APPLES

Ingredients for 4 sandwiches

3 tablespoons unsalted butter

1 pound onions, halved, peeled and thinly sliced

1/2 pound Granny Smith apples, peeled, quartered, cored and thinly sliced

1 teaspoon kosher salt

freshly ground white pepper, to taste

1/2 teaspoon dried herbes de Provence

4 ounces Gruyere cheese, grated

1 loaf focaccia

3 tablespoons unsalted butter, melted.

Melt the butter in a large, heavy skillet.  Add the onion and apple slices, stir to coat them, cover the pan, and cook over medium low heat for 5 minutes.  Remove the lid stir in the salt, pepper and herbes de Provence, and continue cooking until the mixture is soft, another 20-25 minutes.  Off the heat, fold in the grated cheese so that the mixture is somewhat cohesive.

Preheat a grill or griddle.  Cut the focaccia into slices no more than 1/2” thick. Place a thick layer of the onion mixture between slices.  Brush the top slice of each sandwich with melted butter and place it facing down on the grill applying some pressure.  Butter the surface of the slices facing up on the grill.  Turn when the bottom slice is browned, about 3 - 4 minutes, depending on the heat of the grill.  Grill another 3 minutes, or until the cheese begins to ooze out of the sandwich.  Serve immediately with a green salad.